วันศุกร์ที่ 21 กันยายน พ.ศ. 2555

Android Camera

-->


Android Camera Preview


The camera is the most visible and most used sensor in an Android device. It is a selling point for most consumers, and the capabilities are getting better with each generation. Image-processing applications normally work on an image after it is taken, but other applications, such as augmented reality, utilize the camera in real-time with overlays.
There are two ways to access the camera from an application.The first is by declaring
an implicit intent.
The implicit intent launches the default camera interface:
Intent intent = new Intent("android.media.action.IMAGE_CAPTURE");
startActivity(intent);

The second way leverages the Camera class, which provides more flexibility in the settings.This creates a custom camera interface, which is the focus of the examples that follow. Camera hardware access requires explicit permission in the AndroidManifest XML file:
<uses-permission android:name="android.permission.CAMERA" />

This is implied in the following section.

Customizing the Camera

Control of the camera is abstracted into various components in the Android system:

  • Camera class—Accesses the camera hardware
  • Camera.Parameters class—Specifies the camera parameters such as picture size, picture quality, flash modes, and method to assign Global Positioning System (GPS) location
  • Camera Preview methods—Sets the camera output display and toggles streaming video preview to the display
  • SurfaceView class—Dedicates a drawing surface at the lowest level of the view hierarchy as a placeholder to display the camera preview
CameraPreviewActivity.java Code

package android.example.camerapreview;

import android.os.Bundle;
import android.app.Activity;
import android.view.Display;
import android.view.Menu;
import android.view.SurfaceView;
import android.view.Window;

public class CameraPreviewActivity extends Activity {

      private int viewWidth = 320;
    private int viewHeight = 240;
           
    private SurfaceView cameraPreview;
           

    @Override
    public void onCreate(Bundle savedInstanceState) {
               
       super.onCreate(savedInstanceState);
       requestWindowFeature(Window.FEATURE_NO_TITLE);
               
       calculateDisplayDimensions();                   
       cameraPreview = new CameraPreview(this);
       setContentView(cameraPreview);
      
    }
           
    private void calculateDisplayDimensions() {
       Display display = getWindowManager().getDefaultDisplay();
       viewWidth = display.getWidth();
       viewHeight = display.getHeight();
    }   
      
}


CameraPreview.java Code


package android.example.camerapreview;

import android.app.Activity;
import android.os.Bundle;
import android.content.Context;
import android.hardware.Camera;
import android.util.Log;
import android.view.SurfaceHolder;
import android.view.SurfaceView;
       
      public class CameraPreview extends SurfaceView implements SurfaceHolder.Callback {
       
          private SurfaceHolder holder;
          private Camera camera;
       
          public CameraPreview(Context context) {
              super(context);
              holder = getHolder();
              holder.addCallback(this);
              holder.setType(SurfaceHolder.SURFACE_TYPE_PUSH_BUFFERS);
          }
       
          //@Override
          public void surfaceChanged(SurfaceHolder holder2, int format, int w, int h) {
              Camera.Parameters parameters = camera.getParameters();
              parameters.setPreviewSize(w, h);
              camera.setParameters(parameters);
              camera.startPreview();
          }
       
          //@Override
          public void surfaceCreated(SurfaceHolder holder1) {
              try {
                  camera = Camera.open();
                  camera.setPreviewDisplay(holder1);
              }
              catch (Exception e) {
                  Log.i("Exception surfaceCreated()", "e=" + e);
                  camera.release();
                  camera = null;
              }
       
      }
                      
          //@Override
          public void surfaceDestroyed(SurfaceHolder arg0) {
              camera.stopPreview();
              camera.release();
              camera = null;
          }
          
      }


AndroidMainifest.xml Code


<manifest xmlns:android="http://schemas.android.com/apk/res/android"
    package="android.example.camerapreview"
    android:versionCode="1"
    android:versionName="1.0" >

    <uses-sdk
        android:minSdkVersion="8"
        android:targetSdkVersion="15" />

    <application
        android:icon="@drawable/ic_launcher"
        android:label="@string/app_name"
        android:theme="@style/AppTheme" >
        <activity
            android:name=".CameraPreviewActivity"
            android:label="@string/title_activity_camera_preview" >
            <intent-filter>
                <action android:name="android.intent.action.MAIN" />

                <category android:name="android.intent.category.LAUNCHER" />
            </intent-filter>
        </activity>
    </application>
   
     <!-- We will request access to the camera, saying we require a camera
         of some sort but not one with autofocus capability. -->
    <uses-permission android:name="android.permission.CAMERA"/>
      <uses-permission android:name="android.permission.INTERNET" />
       
    <uses-feature android:name="android.hardware.camera" />
    <uses-feature android:name="android.hardware.camera.autofocus" android:required="false" />
    
</manifest>


Download Android Camera Preview Example code


Android Control ควบคุมอุปกรณ์ต่างๆ ด้วย Android

สอนเขียน Android  สอนเขียนโปรแกรม Android
http://androidcontrol.blogspot.com/2012/01/beginning-android-training-android.html


สอนเขียน Android  สอนเขียนโปรแกรม Android แบบ Online

รับสอนเขียนโปรแกรม Android App สอนแบบ online สอนสด ตัวต่อตัว หรือ เป็นกลุ่ม ได้ทั่วประเทศ กำหนดเวลาเรียนได้
การเรียน Android App แบบ online สามารถกำหนดเวลาเรียน เองได้ ตามแต่ตกลงกัน
( รับสอน นอกสถานที่ แบบเป็น กลุ่ม ทั่วประเทศ )

แต่ละ Course ขึ้นอยู่กับพื้นฐานที่มี นะครับ

Course
1.JAVA Programming สำหรับผู้ที่ยังไม่มีพื้นฐานทางด้าน การเขียนโปรแกรม JAVA
เรียน 3-4 ครั้ง ครั้งละ 2 ชั่วโมง  

2.Beginning Android Development เริ่มต้นการพัฒนาด้วย Android ( ต้องมีพื้นฐาน JAVA แล้ว )
เรียน 5-6 ครั้ง ครั้งละ 2 ชั่วโมง 
เรียนจบคอร์สนี้ ก็สามารถทำ Application ได้แล้ว

3.Android Application สอนตามความต้องการในการเขียนโปรแกรม ใช้งานจริง เช่น โปรแกรมใช้งานด้านต่างๆ
ระยะเวลา และ ค่าเรียน ตามแต่ความยากง่ายของโปรแกรม ซึ่งอาจจะรวมสอน JAVA Programming ด้วยสำหรับผู้เริ่มต้นเลย
ดังนั้น ราคาสอน จะขึ้นอยู่กับ สเปคงาน

โปรแกรมที่ใช้ทำการเรียน Team Viewer  Version ล่าสุด Version 8
Meeting ID จะแจ้งให้ก่อนเรียน ผ่านทาง email sms Line หรือ อื่นๆ ตามสะดวก
ใช้ Tab Meeting ใส่ Meeting ID และใส่ชื่อ
แล้ว Join Meeting

ติดต่อ amphancm@gmail.com

วันพุธที่ 12 กันยายน พ.ศ. 2555

Android MediaPlayer

-->

Android MediaPlayer - Audio

There are two distinct frameworks for recording and playing audio.The choice on which to use depends on the application:
  • MediaPlayer/MediaRecorder—This is the standard method to manipulate audio, but must be file- or stream-based data. Creates its own thread for processing. SoundPool utilizes this framework.
  • AudioTrack/AudioRecorder—Provides direct access to raw audio. Useful to manipulate audio in memory, write to the buffer while already playing, or any other usage that does not require a file or stream. It does not create its own thread for processing.
These methods are shown in the following section in various recipes.


Choosing and Playing Back Audio Files
The MediaRecorder and MediaPlayer classes are used to record and play back either audio or video.This recipe focuses on audio, and the usage is straightforward. For playback,
the steps are

1. Create an instance of the MediaPlayer:
MediaPlayer m_mediaPlayer = new MediaPlayer();

2. Specify the source of media. It can be created from a raw resource:
m_mediaPlayer = MediaPlayer.create(this, R.raw.my_music);

Another option is to set as a file from the filesystem (which then also needs a prepare statement):
m_mediaPlayer.setDataSource(path);
m_mediaPlayer.prepare();

In any case, these statements need to be surrounded by a try-catch block because the specified resource might not exist.

3. Start playback of the audio:
m_mediaPlayer.start();

4. When the playback is done, stop the MediaPlayer and release the instance to free up resources:
m_mediaPlayer.stop();
m_mediaPlayer.release();

MainActivity.java Code

package android.example.mediaplayer;

import android.os.Bundle;
import android.app.Activity;
import android.content.Intent;
import android.view.Menu;
import android.view.View;
import android.view.View.OnClickListener;
import android.widget.Button;

public class MainActivity extends Activity {
     
               
          private Button mlocalaudio;
          private Button mresourcesaudio;
          private Button mstreamaudio;
          private static final String MEDIA = "media";
          private static final int LOCAL_AUDIO = 1;
          private static final int STREAM_AUDIO = 2;
          private static final int RESOURCES_AUDIO = 3;
        

    @Override
    public void onCreate(Bundle savedInstanceState) {
        super.onCreate(savedInstanceState);
        setContentView(R.layout.activity_main);
               
        mlocalaudio = (Button) findViewById(R.id.localaudio);
        mlocalaudio.setOnClickListener(mLocalAudioListener);
        mresourcesaudio = (Button) findViewById(R.id.resourcesaudio);
        mresourcesaudio.setOnClickListener(mResourcesAudioListener);
      
    }
   
    private OnClickListener mLocalAudioListener = new OnClickListener() {
        public void onClick(View v) {
            Intent intent =
                    new Intent(MainActivity.this.getApplication(),
                            MediaPlayerDemo_Audio.class);
            intent.putExtra(MEDIA, LOCAL_AUDIO);
            startActivity(intent);

        }
    };
    private OnClickListener mResourcesAudioListener = new OnClickListener() {
        public void onClick(View v) {
            Intent intent =
                    new Intent(MainActivity.this.getApplication(),
                            MediaPlayerDemo_Audio.class);
            intent.putExtra(MEDIA, RESOURCES_AUDIO);
            startActivity(intent);

        }
    };
 
}


MediaPlayerDemo_Audio.java Code

package android.example.mediaplayer;

import android.app.Activity;
import android.media.MediaPlayer;
import android.os.Bundle;
import android.util.Log;
import android.widget.TextView;
import android.widget.Toast;


public class MediaPlayerDemo_Audio extends Activity {

    private static final String TAG = "MediaPlayerDemo";
    private MediaPlayer mMediaPlayer;
    private static final String MEDIA = "media";
    private static final int LOCAL_AUDIO = 1;
    private static final int STREAM_AUDIO = 2;
    private static final int RESOURCES_AUDIO = 3;
     
    private String path; 
    private TextView tx;

    @Override
    public void onCreate(Bundle icicle) {
        super.onCreate(icicle);
        tx = new TextView(this);
        setContentView(tx);
        Bundle extras = getIntent().getExtras();
        playAudio(extras.getInt(MEDIA));
    }

    private void playAudio(Integer media) {
        try {
            switch (media) {
                case LOCAL_AUDIO:
                    /**
                     * TODO: Set the path variable to a local audio file path.
                     */
                    path = "/sdcard/My Music/test.mp3";
                    if (path == "") {
                        // Tell the user to provide an audio file URL.
                        Toast
                                .makeText(
                                        MediaPlayerDemo_Audio.this,
                                        "Please edit MediaPlayer_Audio Activity, "
                                                + "and set the path variable to your audio file path."
                                                + " Your audio file must be stored on sdcard.",
                                        Toast.LENGTH_LONG).show();

                    }
                    mMediaPlayer = new MediaPlayer();
                    mMediaPlayer.setDataSource(path);
                    mMediaPlayer.prepare();
                    mMediaPlayer.start();
                    break;
                case RESOURCES_AUDIO:
                    /**
                     * TODO: Upload a audio file to res/raw folder and provide
                     * its resid in MediaPlayer.create() method.
                     */
                    mMediaPlayer = MediaPlayer.create(this, R.raw.music);
                    mMediaPlayer.start();

            }
            tx.setText("Playing audio...");

        } catch (Exception e) {
            Log.e(TAG, "error: " + e.getMessage(), e);
        }

    }

    @Override
    protected void onDestroy() {
        super.onDestroy();
        // TODO Auto-generated method stub
        if (mMediaPlayer != null) {
            mMediaPlayer.release();
            mMediaPlayer = null;
        }

    }
}

activity_main.xml Code

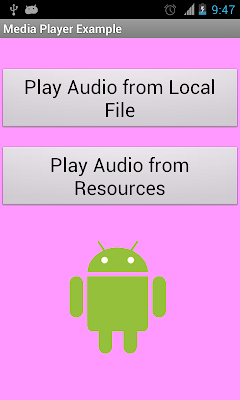
<?xml version="1.0" encoding="utf-8"?>
<LinearLayout xmlns:android="http://schemas.android.com/apk/res/android"
    android:orientation="vertical"
    android:background="#FF99FF"
    android:layout_width="match_parent"
    android:layout_height="match_parent"
    >
   
    <Button
        android:id="@+id/localaudio"
        android:layout_width="match_parent"
        android:layout_height="wrap_content"
        android:textSize="26dp"
        android:layout_marginTop="40dp"
        android:text="Play Audio from Local File" />
   
    <Button
        android:id="@+id/resourcesaudio"
        android:layout_width="match_parent"
        android:layout_height="wrap_content"
        android:textSize="26dp"
        android:layout_marginTop="20dp"
        android:text="Play Audio from Resources" />

    <ImageView
        android:id="@+id/imageView1"
        android:layout_width="wrap_content"
        android:layout_height="wrap_content"
       
        android:layout_gravity="center_horizontal"
        android:layout_marginTop="20dp"
        android:src="@drawable/android_logo" />
   
</LinearLayout>


Download Android Media Player Example code


Android Control ควบคุมอุปกรณ์ต่างๆ ด้วย Android

สอนเขียน Android  สอนเขียนโปรแกรม Android